Is it possible to smoothly plan, track, and complete a project from beginning to end without stress or disorder?
Yes, with the combination of Microsoft Planner and Timeneye time tracking!
In this article, we'll get into the basics of using Microsoft Planner for tracking projects, tasks, and deadlines. We'll teach you how to set up your projects and plans, how to create and assign tasks, and how to track time and budgets to meet all the deadlines and deliverables.
Why Microsoft Planner? Key benefits and project management features
Microsoft Planner is a tool designed for project management, similar to other major platforms like Asana, Trello, and Planner's cousin, Microsoft Project. Microsoft Planner initially served as a simple project management tool, but since 2024, Microsoft has rolled out significant updates that have transformed it. These updates have introduced new features and integrated more advanced functionalities from Microsoft Project into Microsoft Planner, aiming to bring all project management capabilities into a single, unified tool.
Apart from the features, a significant benefit of Microsoft Planner (like many other Microsoft product), is its seamless integration with the rest of the Microsoft Suite.
Microsoft Planner offers a sleek and minimalist interface, making it an easy-to-use software that still includes all the necessary features to manage a project from start to finish.
Top Microsoft Planner features for Project management:
- simple style interface, with many views like lists, grids, and Kanban to visualise process success;
- visualization of tasks, complete with priorities, assignees, and deadlines;
- colorful and versatile task labels for cross-project tracking;
- attaching files within tasks and utilizing comments for team collaboration;
- integration with Microsoft 365;
- timelines and advanced features available in the premium plans.
Setting up your Microsoft Planner account
Getting Started with Microsoft Planner? Here's how to do it.
After having purchased the Microsoft Planner Subscription plan that best suits your needs, log in with a Microsoft Account to access Microsoft Planner. The first thing to do is to set up the account according to your team's needs. You may even customize its appearance with the colors you like, as well as the languages and time zones.
While the Microsoft Planner web app in enough on its own, you also have the option of downloading the mobile app for on-the-go project management.
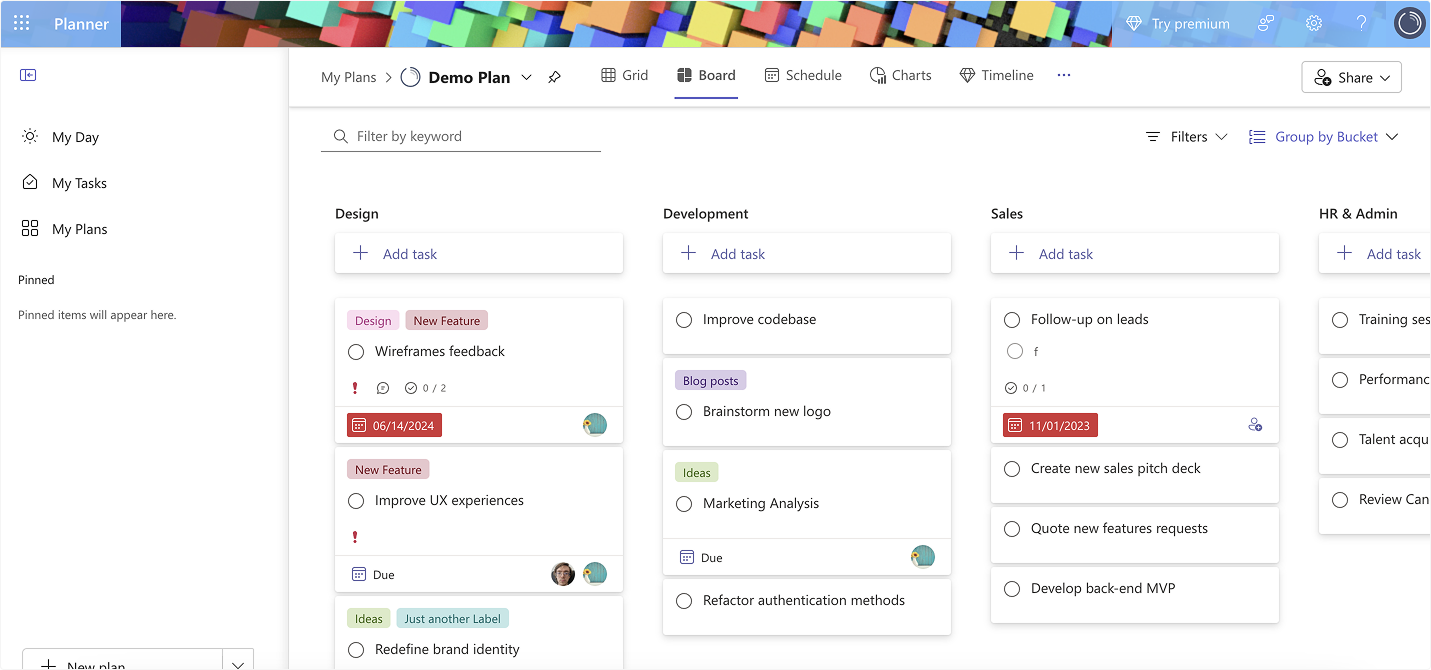
Navigating the Microsoft Planner interface
To get used to the interface and its features, you need to learn a bit about Microsoft Planner and where you will find the main features.
- My Day, My Tasks and My Plans views: the Homape of Microsoft Planner, where you can quickly identify the items you're waring on;
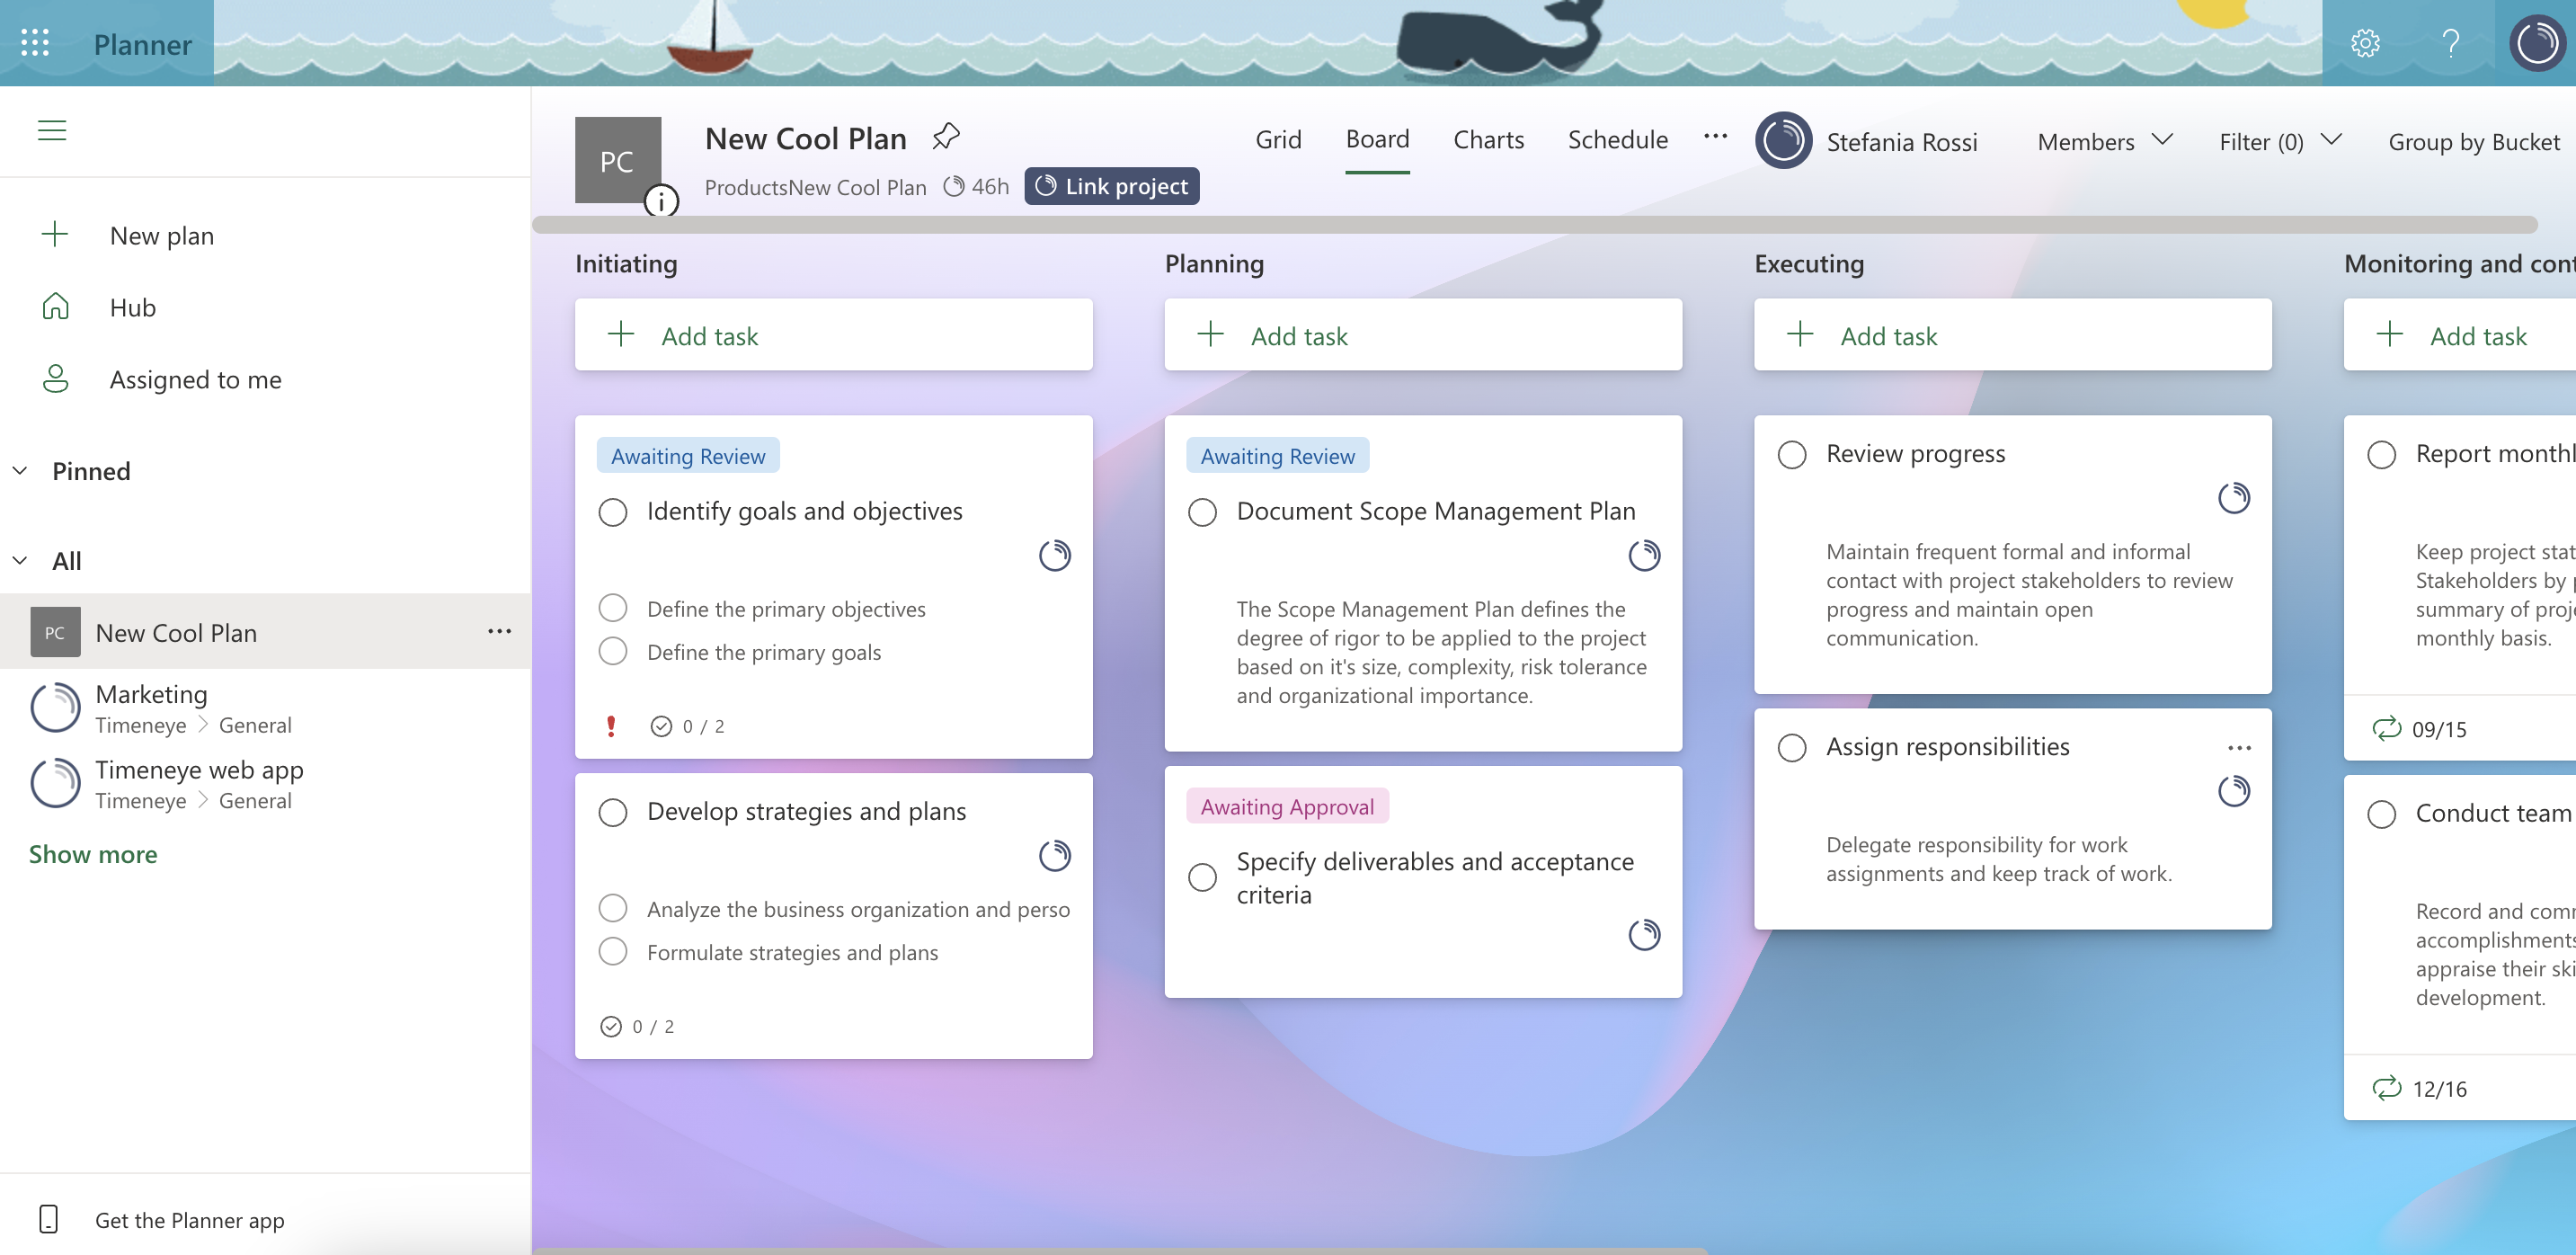
- Boards: the main layout of a project in Microsoft Planner, a kanban-style layout where you'll find plans, buckets and tasks. A Grid Layout is available, too;
- Plans: your projects in Microsoft Planner;
- Buckets: subcategories or phases of a plan that you can add tasks to;
- Tasks: the individual action items to complete the projects;
- Labels: tags you can use in your tasks to categorize them

How to Create a Plan
Always have a plan!
No, really, the projects in Planner are called Plans. For every project you want to track in Microsoft Planner, you need to create a new Plan.
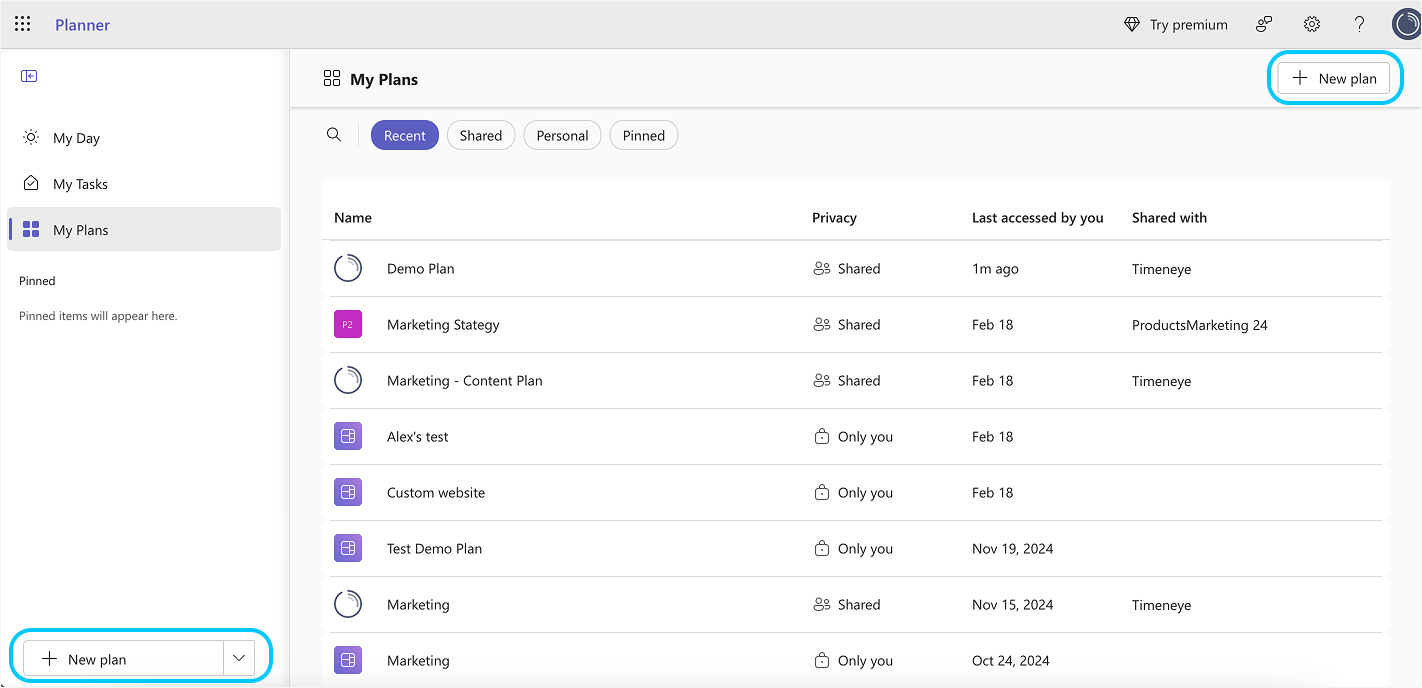
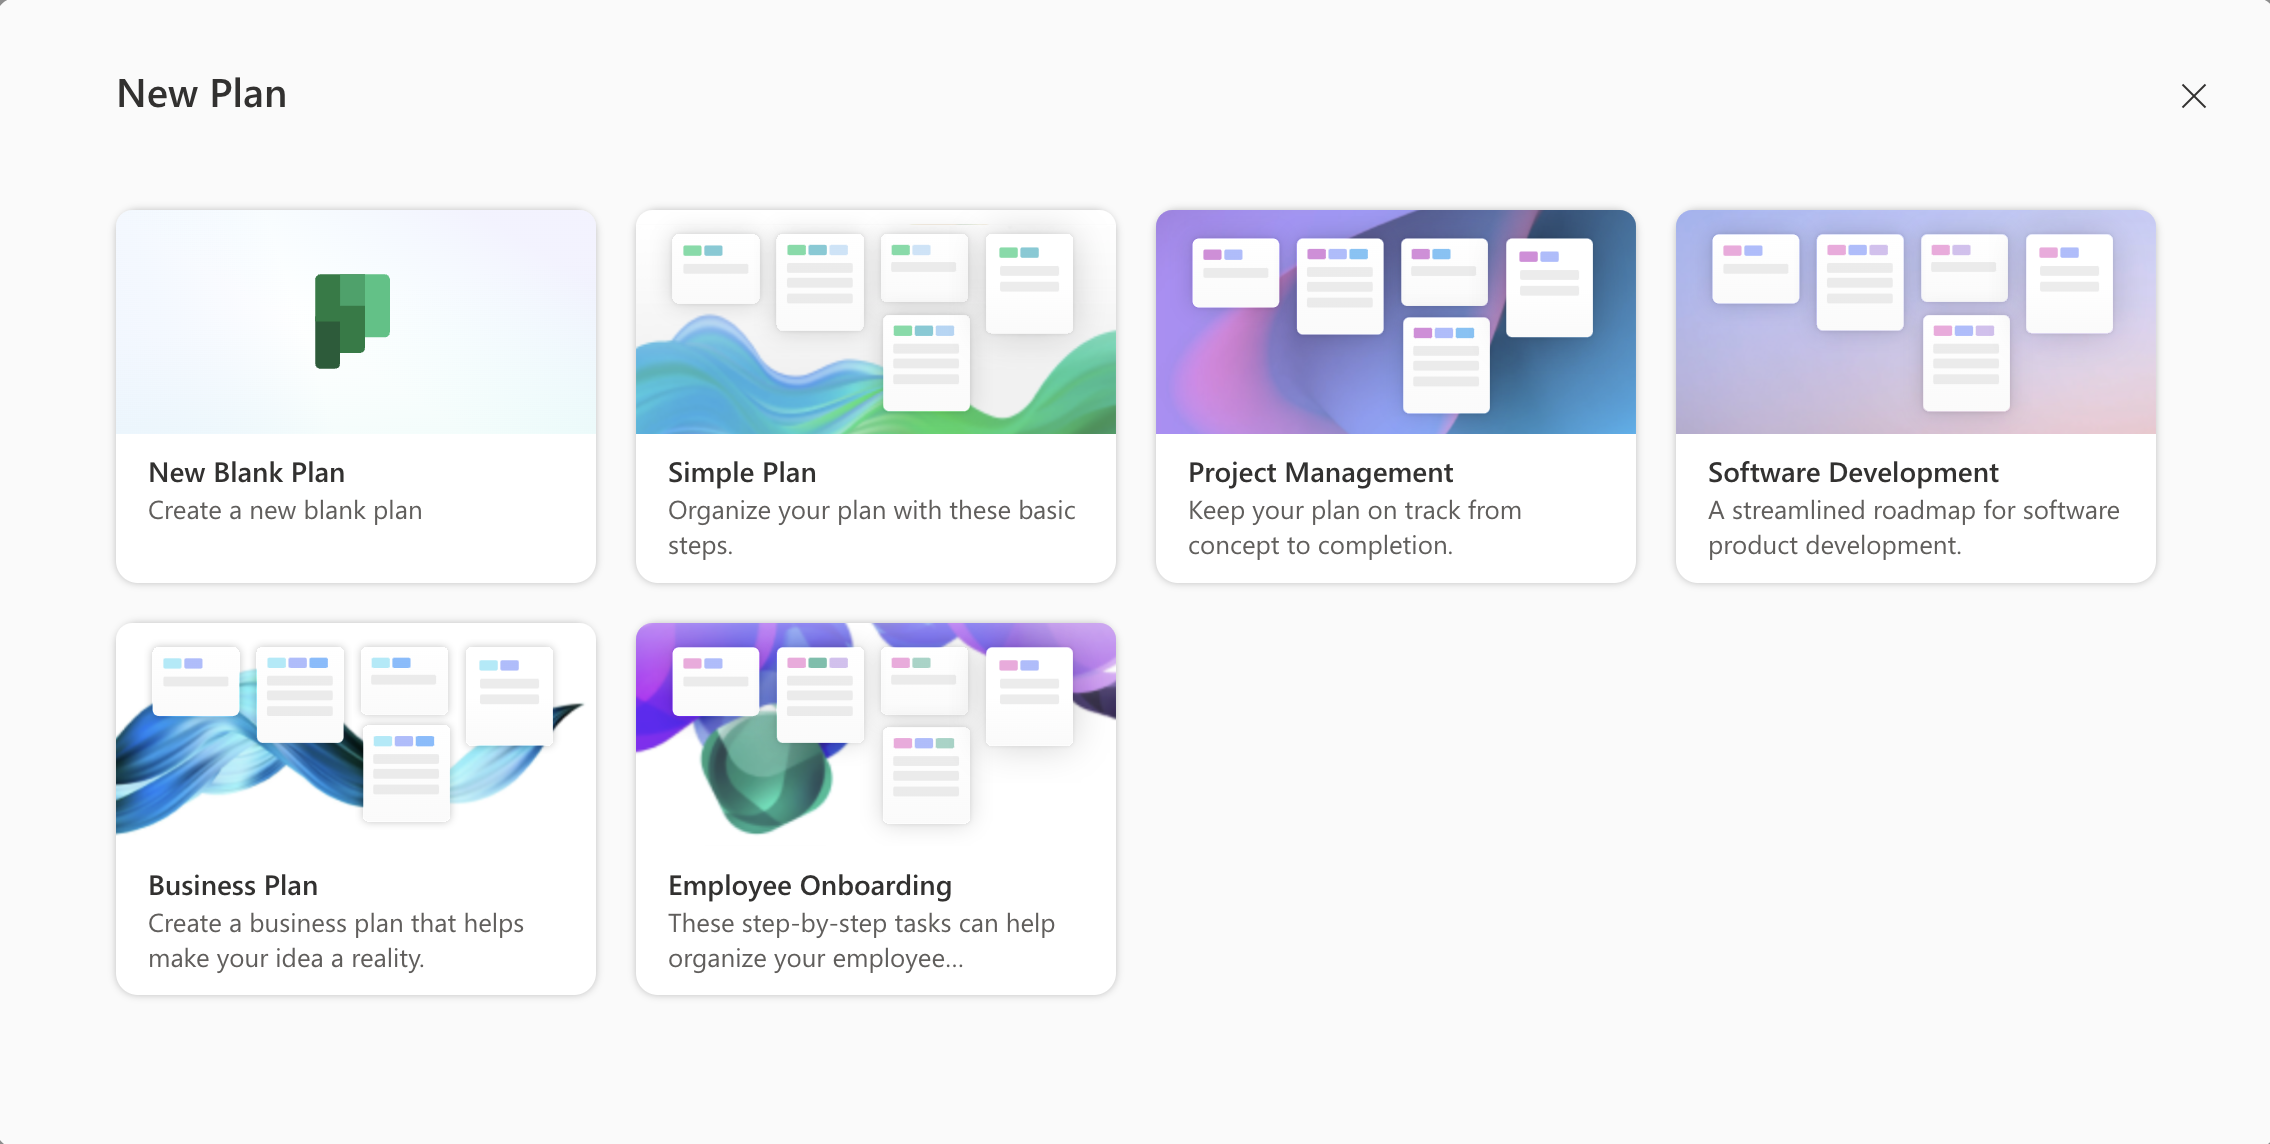
You can start from scratch or use one of the pre-made templates. Select a descriptive name for your plan that clearly reflects the project at hand. Next, configure the appropriate privacy settings to suit your team's requirements.
In addition to creating plans, Microsoft Planner also requires you to create Buckets.
Buckets are essentially categories or groups that help you further categorize and prioritize your tasks within a plan. Buckets allow you to organize tasks by their stage, priority, or any other relevant criteria that suits your project's needs.
All these steps only take a few minutes, so you'll be ready to create tasks next.
But how do you create tasks in Planner? Let's see the basics of task management in Microsoft Planner in the next chapter.
Creating and managing tasks in Microsoft Planner
Under every bucket you created, find the button to add a task ("Add task").
Simply add the task name. Try to be as specific as possible so the person who will be assigned the task knows what they're supposed to do. Then, add a due date (if relevant) and assign it to yourself or a team member. And it's done.
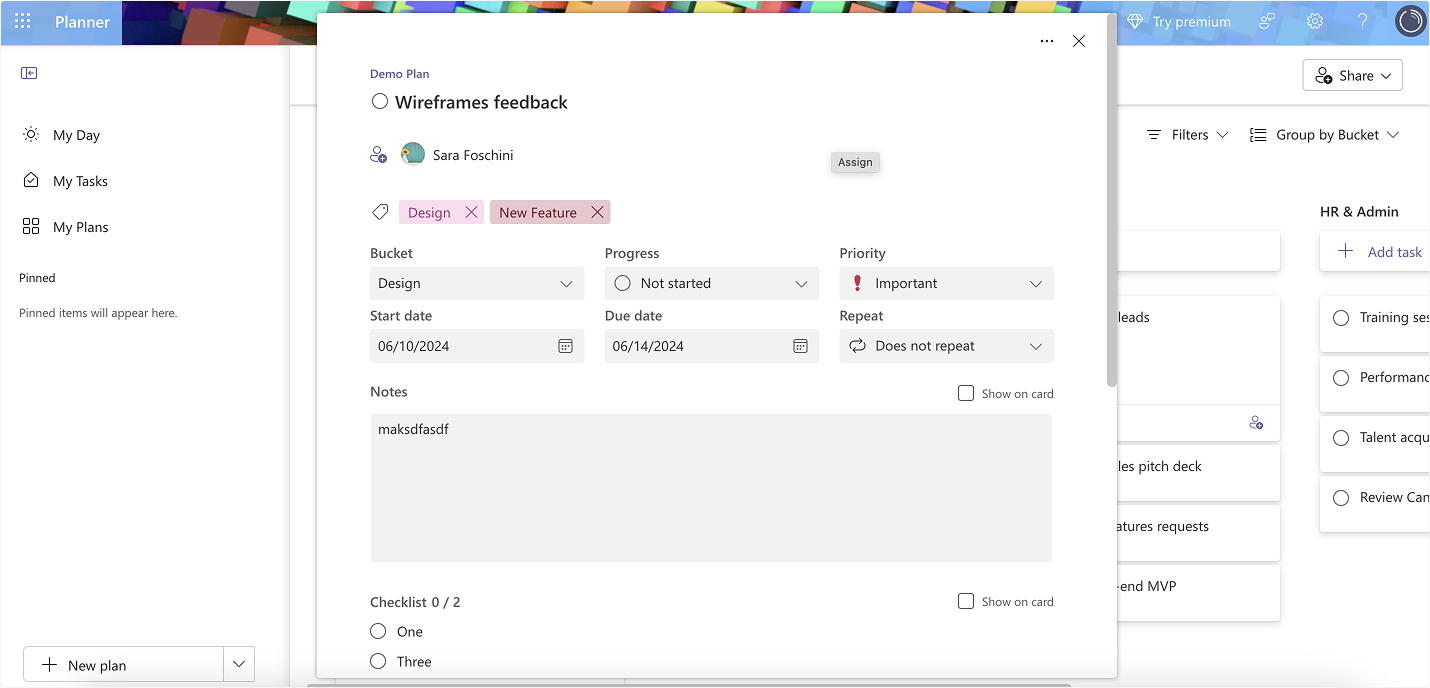
But Microsoft Planner's task management features don't end there: just click on the task you created to expand it.
In the Task detail panel, you have the opportunity to add details such as priority and status. Additionally, you can mark a task as "repetitive" if it represents an assignment that needs to be done regularly.
You can also add to-dos (or subtasks) related to the same task. This feature is particularly useful if you have a big task that needs to be broken down into smaller steps.
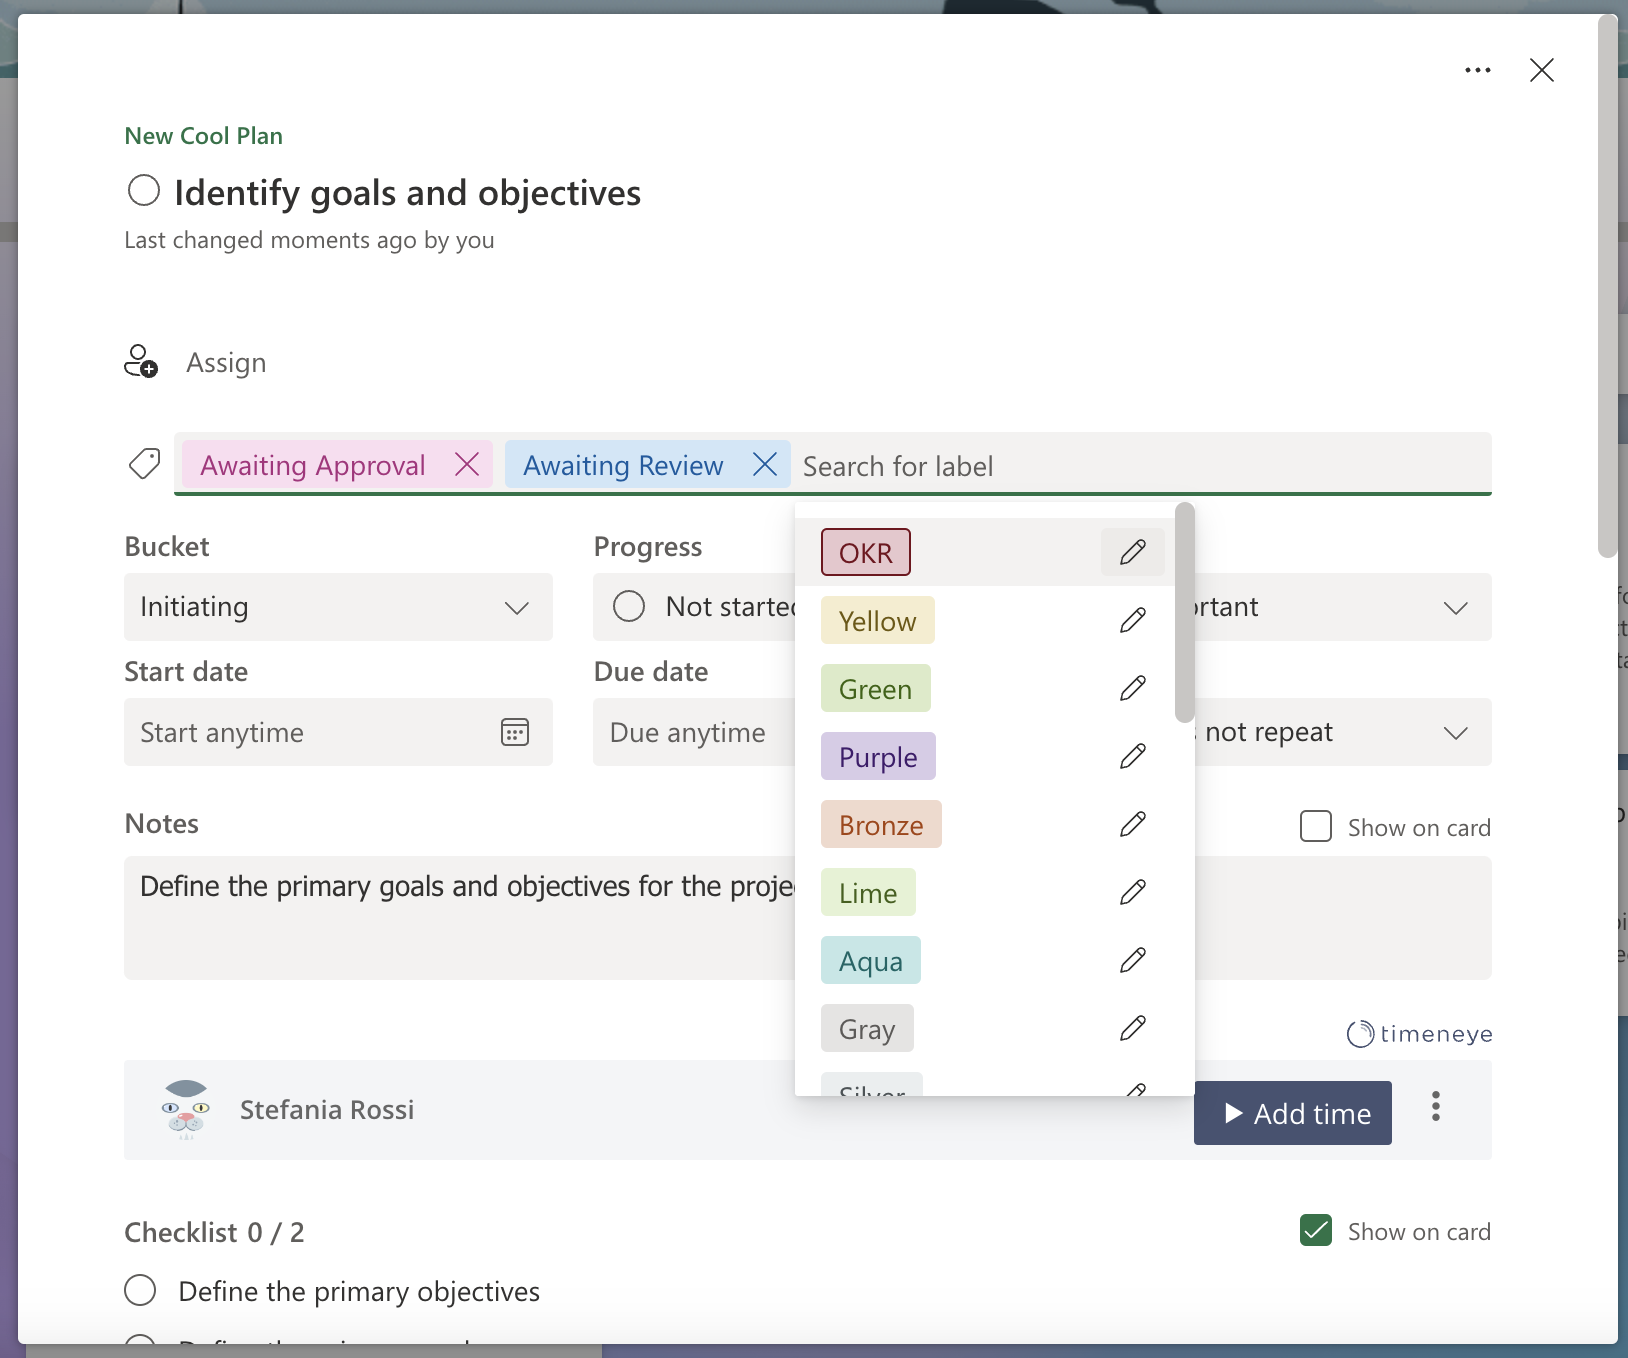
Microsoft Planner Labels: how to use them
Labels are an incredibly useful feature in Microsoft Planner that allows you to categorize and organize your tasks effectively using colorful tags that are easy to visualize in the interface. By creating labels, you identify at a glance different types of tasks or specific attributes associated with them.
For example, you can create labels based on different project phases or departments involved in the project, making it easier to track progress and assign tasks to the relevant team members.
To label a task, simply choose the task you want to assign a label to and select the appropriate label from the labels' menu. The colorful label will then be displayed alongside the task, making it visually easy to identify.
You can also filter and search for specific tasks based on their assigned labels.
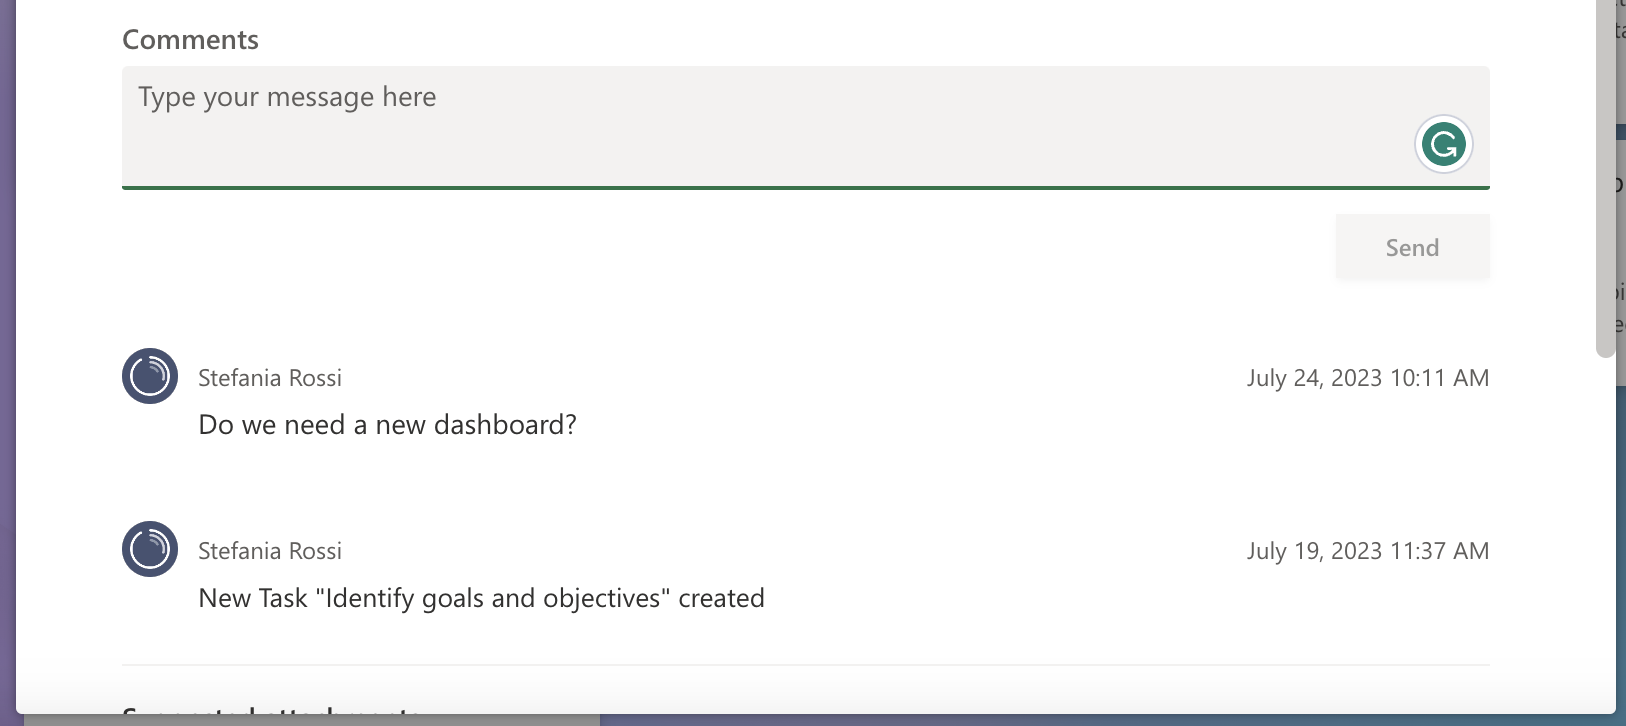
Collaborating with comments and attachments in Microsoft Planner
Collaboration between team members is key to the successful completion of projects. Especially if you have multiple team members juggling multiple projects, every person involved needs to know what they're working on, what deadlines they have and keep all the relevant material (documents, briefs, etc) at hand.
Attachments can be added to Microsoft Planner tasks, making sure every person assigned to the task has quick access to the documents they need.
Comments are another useful Microsoft Planner feature for teams to better cooperate. Team members can use comments to ask questions, explain edits, report problems, and in general, keep the rest of the team updated and on the same page.
Tracking progress and deadlines in Microsoft Planner
Right in your Microsoft Planner interface, next to the board view, there's another view called the "Schedule" view.
It's basically a calendar dashboard where you can see all the deadlines, and start and finish dates of your tasks. This view is very useful to keep track of multiple deadlines.
Alternatively, you have the option to create a Gantt chart, to track complex timelines and dependencies.
Time tracking: adding Timeneye and tracking time for tasks
Timesheets are a necessary but often tedious task. Time tracking is crucial for both administrative purposes, and for ensuring that a project stays on budget and on track. Without accurate time tracking, projects can easily go out of control.
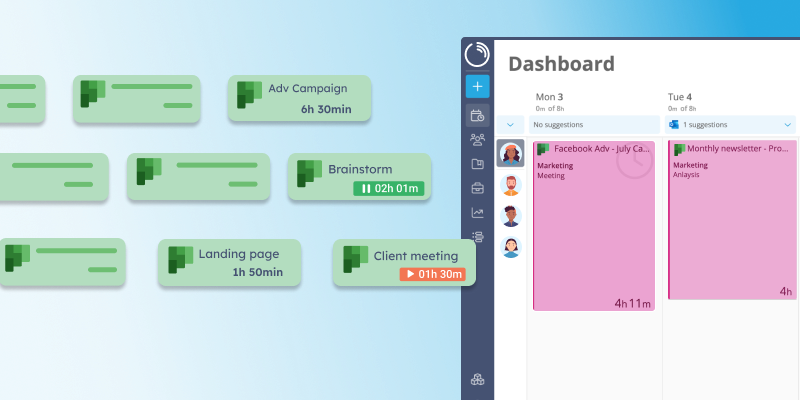
Fortunately, Timeneye time tracking offers a solution that seamlessly integrates with Microsoft Planner.
By adding a convenient time tracking button next to your tasks in Microsoft Planner, Timeneye allows you to effortlessly keep track of the time spent on each project phase and task.
You won't have to juggle multiple tabs or deal with complicated interfaces anymore. The time tracking button fits effortlessly in the interface and in your workflow. Now, you'll have a clear understanding of how much time each task is taking, and all this data will be securely stored in the software, readily available for monitoring and analysis.
This information is invaluable for project managers, as it enables them to meet deadlines, manage workloads effectively, and make more accurate estimates for future projects.
Integrating Microsoft Planner with other Microsoft apps
As we mentioned at the beginning of the article, Microsoft Planner can be connected (a part from Timeneye) with other tools, specifically with other Microsoft Suite tools:
- it connects to Microsoft Viva Goals, for goal and OKR tracking and planning, and to check the overall's team performance and engagement;
- You can add a Plan and its deadlines to an Outlook Calendar;
- You can open any plan in Microsoft Teams (which has a dedicate Planner app as well);
- It's possible to export Microsoft Planner data and import it into Microsoft Power BI, where you can create beautifully visual dashboards, graphs, and charts;
- Finally, you can use Microsoft Power Automate to build custom connections and integrations using triggers.
Conclusions
In conclusion, Microsoft Planner offers a seamless and efficient solution for planning, tracking, and executing projects with ease.
Its integration with the Microsoft Suite, sleek interface, and essential project management features make it a valuable tool for any project.
By integrating with Timeneye for time tracking and other Microsoft apps for enhanced functionality, Microsoft Planner becomes even more powerful. Overall, Microsoft Planner is a must-have tool for painlessly managing projects and achieving success.
So why not dive in and explore the world of efficient project management with Microsoft Planner and Timeneye?

_%20hero%20image-1.png)
