Do you want to manage projects with Microsoft Planner but are unsure about how to handle certain complexities? This guide will show you how to easily create subtasks (aka "Checklists") in the new Microsoft Planner, and how to use them to allocate time and resources across complex projects properly.
Summary
Microsoft Planner lets users create subtasks in Checklists. Checklists can be added within the task itself—right in the Task details. By expanding the task details, users can add checklists to track subtasks. While Microsoft Planner has some limitations, it breaks down big projects into smaller steps.
How to Create Subtasks in Microsoft Planner
Microsoft Planner’s recent updates have made it possible to create and manage subtasks directly within the app.
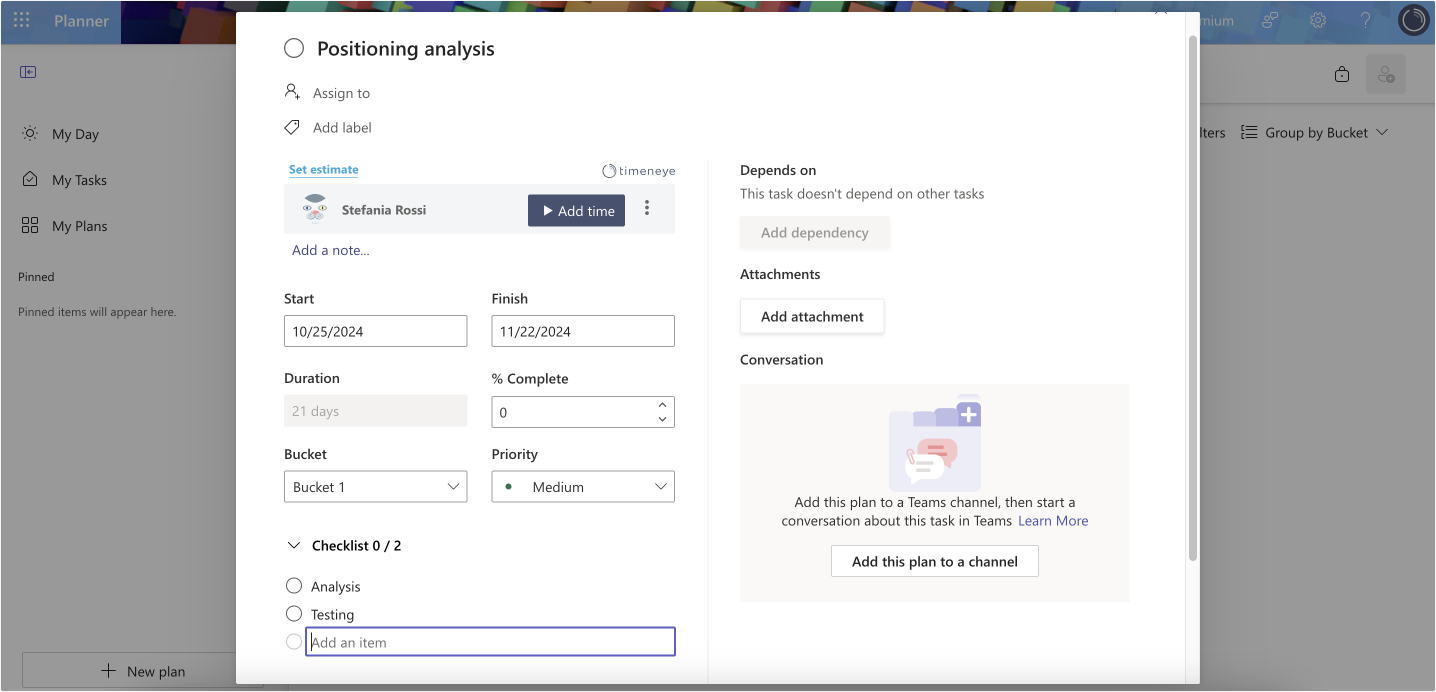
- Open a Task: Start by opening an existing task in your project board;
- Add Subtasks: Within the task window, locate the option called “Checklist.” Here, you can add subtasks by simply typing in each one and pressing “Enter.”

- To Edit a Subtask, Go back to the individual task and click on it to open the task detail. You can easily manually edit the subtask from there.
Although Planner doesn't offer much for subtask features (like assigning start and end dates per subtask), this checklist functionality allows project managers to break down major tasks, offering better management over complex projects.
Where to find your subtasks in Microsoft Planner
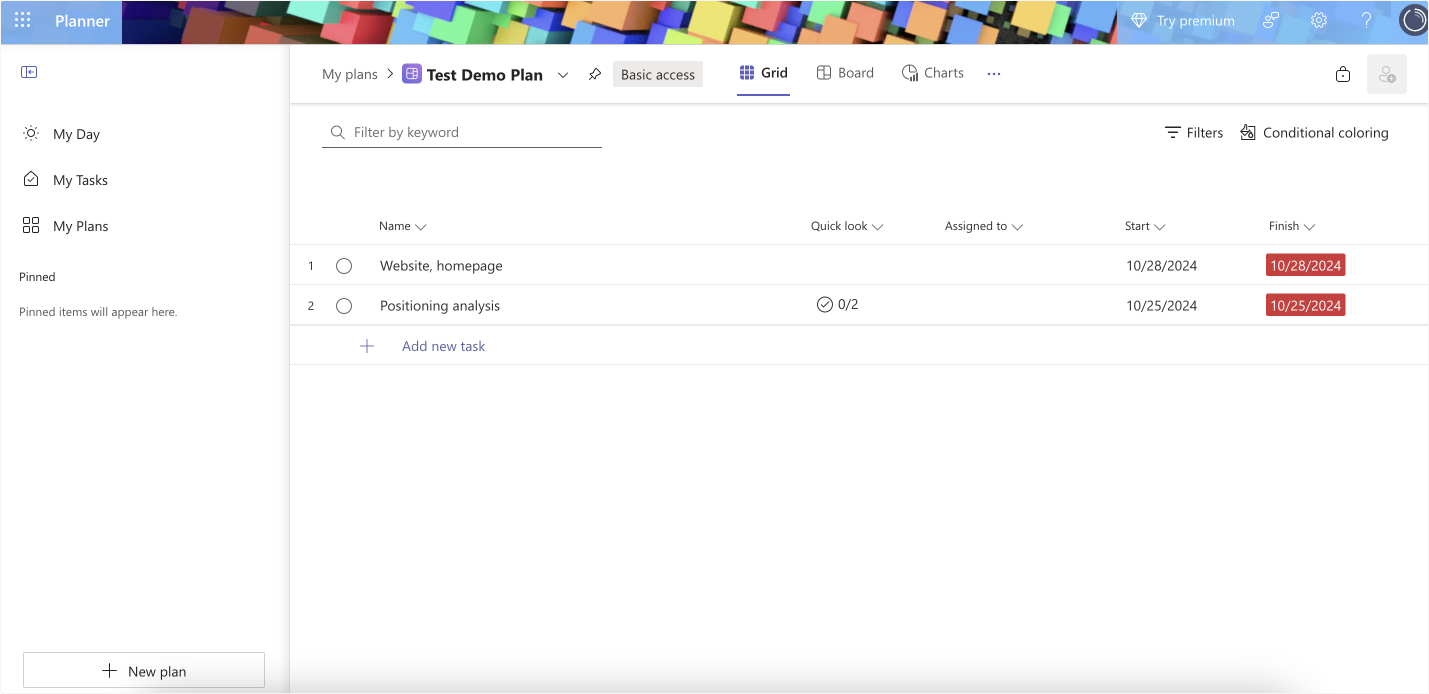
Need to make a quick edit, or see how you've progressed with your tasks? Head back to the project plan:
- If you use the Microsoft Planner Grid view, find the Checklist column and see how many subtasks are left;

- In the Microsoft Planner Board view, you need to actually click on the task to enter the task detail view. Scroll until you find the Checklist items.
Bonus tips: Use Subtasks for Resource Allocation
Resource allocation is one of the trickiest aspects of managing complex projects. With multiple tasks and team members involved, keeping track of both time and resources allocated to each step in a project is essential. Subtasks enable project managers to:
- By organizing tasks at the subtask level, agencies can easily visualize what resources (time, team members, or budget) are necessary to complete a phase.
- Breaking down tasks into subtasks allows for better time management. Knowing how much time each subtask requires makes it easier to allocate time to each task.
- And ultimately, organized subtasks can boost overall project profitability by ensuring it's completed on time.
The Importance of Subtasks in Complex Projects
By allowing tasks to be divided into smaller, manageable parts, subtasks provide clarity and make tracking easier.
This level of organization is essential in complex projects with various assignments and timelines. By organizing tasks into smaller steps, subtasks help agencies manage resources more effectively and gain better control over project timelines. For further insights into tracking a project timeline, check out our Gantt chart guide.
Best Practices for Managing Complex Projects in Microsoft Planner
1. Use Labels to Organize at a global level
Labels are a smart way to categorize tasks across multiple projects. For agencies working with different departments or client types, labels like “High Priority,” “Client Review,” or “Internal Task” help clarify task status, priority, or department assignment. Labels also allow project managers to filter tasks easily;
2. Use Buckets smartly
Agencies that frequently manage long-term projects can use buckets to represent stages like Planning, In Progress, and Review. This organization helps simplify updates and provides an immediate visual of the project status;
3. Assign Tasks to Team Members
Assigning tasks (and subtasks) to specific team members is crucial for project completion and accountability. Everyone must be clear on their responsibilities and deadlines, helping avoid confusion about assignments and ensuring the tasks flow smoothly;
4. Track Time at the task level
For project managers focused on efficiency, tracking time at the subtask level is invaluable. By integrating Timeneye with Planner, you can track time spent on each subtask and evaluate productivity in real-time. Timeneye allows managers to assess where the team is spending the most time and identify opportunities for improved efficiency. This feature is particularly helpful in spotting areas where projects might be over budget or behind schedule.
Conclusion
In conclusion, mastering the use of subtasks in Microsoft Planner can significantly improve your project management capabilities. By breaking down complex projects into manageable parts, you can allocate resources more effectively and ensure timely completion. To further optimize your workflow, consider integrating Timeneye with Microsoft Planner.
So start tracking your time today and take control of your projects like never before!