Introduction
If your agency is set on choosing Microsoft Planner as its main project management tool, you've found the right article. In this blog post, we'll show you how to manage your agencies' projects from start to finish, with Microsoft Planner - so that all your projects are delivered on point and on time.
Summary
Agencies can easily manage their projects in Microsoft Planner, by using features designed for management. Companies can integrate Microsoft Planner with the whole Microsoft suite, then set up their Kanban board to make sure they have control over the progress of the progress, and track all aspects of it with tasks, labels, comments, and time tracking.
Why agencies need a project management tool
It's no secret why project management tools are so popular. When managing multiple projects, the chances of running into issues and delays increase exponentially. Keeping all projects, tasks, and deadlines in a centralized space, and automating updates, streamline the process and make sure all deliverables are properly met.
Getting Started with Microsoft Planner
Purchasing a Microsoft Planner Subscription
Microsoft Planner is included in the Microsoft 365 suite. With the latest Microsoft Planner rollout, Microsoft has updated its pricing plans. Many features previously exclusive to Microsoft Projects are now available in Microsoft Planner, depending on your subscription tier.
To choose the best plan for your team, start by assessing your team’s specific needs. Identify the features they require, the level of project complexity you’ll handle, and the number of seats needed since subscriptions are calculated per user. This will help you select a subscription plan that aligns with your workflow and budget.
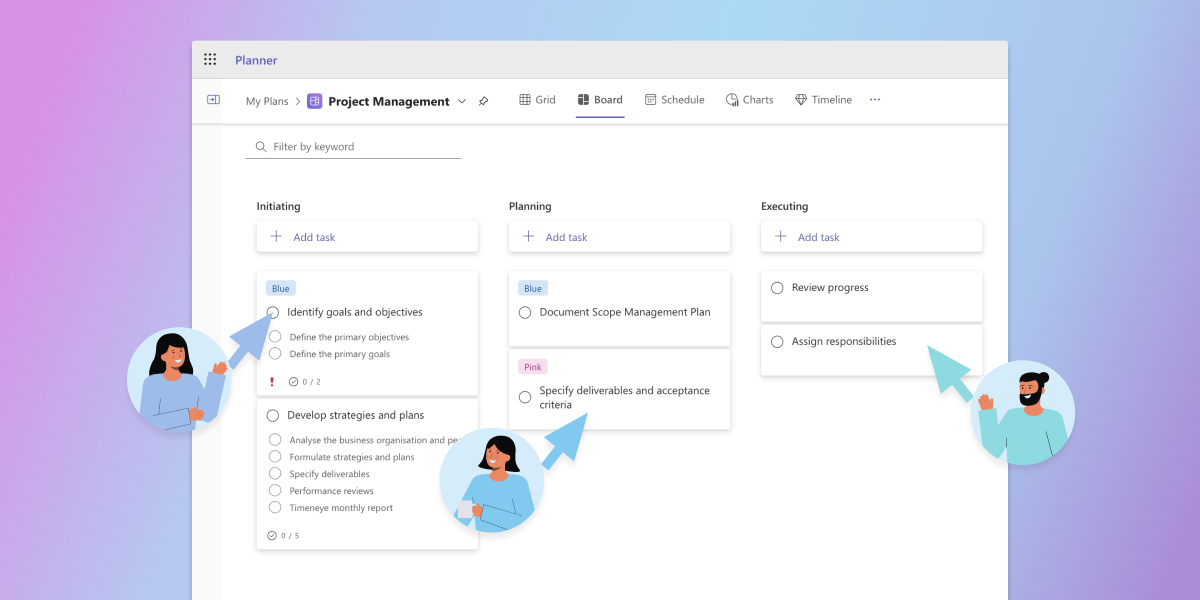
Navigating the Microsoft Planner interface
Once you access Microsoft Planner for the first time, you need to know how to where to find your features. On the left side bar, you'll see the list of all the plans in the workspace, as well as the button to create a new project. When you click on a specific project, right on top next to the Project's name, you can easily switch from a list to a board view, or the timeline and schedule view if your subscription allows it. Then on the top right, you'll find the button to add people to the project.
Basic Microsoft Planner Glossary
- Boards: the main layout of a project in Microsoft Planner, where you'll find plans, buckets and tasks;
- Plans: your projects in Microsoft Planner;
- Buckets: subcategories or phases of a plan that you can add tasks to;
- Tasks: the individual action to complete the projects;
- Labels: tags you can use in your tasks to categorize them
Microsoft Planner: Key Features for Agencies
- Integration with Microsoft Tools: Because Planner is part of the Microsoft 365 suite, it integrates effortlessly with Outlook, Microsoft Teams, OneDrive, and SharePoint, making it easier for agencies to stay connected and organized.
- Task Assignments and Labels: Microsoft Planner lets you create tasks, assign them to team members, set deadlines, and use labels to categorize tasks across projects.
- Kanban Boards: Microsoft Planner uses a simple board layout (similar to Asana’s or Trello's Kanban board), which is easy to navigate and makes it simple to track the progress of tasks and projects.
- Collaboration Features: With the Microsoft Teams integration, Microsoft Planner allows for seamless communication and collaboration across the agency. Team members can comment on tasks, share files, and receive real-time updates.
- Mobile Access: The Planner mobile app allows team members to stay on top of their tasks and deadlines even when they’re on the go.
- Time tracking: the bad news is that Microsoft Planner doesn't have a built-in time tacker. The good news is there are many third-party tools to do that, like Timeneye (which allows users to sync Timeneye to Microsoft Planner, and also embed a small Timeneye button directly to Planner tasks to track time for it. Timeneye also allows users to set task estimates and track time against those estimates.
Creating Your First Projects
To create your first plan (a.k.a. project), click the New Plan button. This will take you to the plan creation process, where you can either use pre-made templates or start from scratch.
You can give your project a name and, optionally assign it to a group. After setting it up, you can structure your plan by adding tasks and sorting them into as many buckets as necessary. You have the option to view your tasks and buckets in either a list format or a Kanban-style board.
Lastly, to add your team members and collaborators to the plan, go to the top right corner of the interface where you'll find the Share button. Clicking this button will open a dialog box that allows you to invite colleagues by entering their email addresses.
Creating, Assigning Tasks to Users
Creating a task is simple—just click the "+ Add task" button under the relevant bucket. This allows you to quickly input basic details for the task. Once you've named the task and set a due date, find the "Assign" option so that you can assign it to specific users in your team.
.png?width=2145&height=1032&name=assign%20task%20(1).png)
Managing Tasks on the Kanban Board
If you're using Microsoft Planner in Kanban view, updating task statuses is as simple as dragging and dropping tasks across the board to a different bucket. This visual approach helps you and your team track progress and maintain a clear overview of the project's status.
When you click on a task, you have the ability to modify its details, such as assigning a label for more effective categorization and prioritizing its importance.
Collaborating Through Comments
Microsoft Planner's comment feature is designed to facilitate collaboration and keep team members aligned. To leave a comment, click on the task, scroll down to the comment field, type your message, and hit Send.
For instance, if a team member encounters an issue—such as missing materials—they can report it directly in the comments to keep everyone informed.
Microsoft Planner Expert tips
Expert Tips n1: Use Microsoft Planner Labels for cross-project tracking
Microsoft Planner’s labels feature can be used for organizing and tracking tasks across multiple projects. Labels can be customized with color-coded tags to represent categories, priorities, or themes that apply across your plans. For example, you can use a label to mark tasks related to a specific project phase, or client.
To assign a label, simply open a task, select a label, and customize its name to suit your needs. Using consistent labels across projects helps you and your team quickly identify related tasks, maintain focus, and organize your process, ensuring nothing slips through the cracks.
Expert Tipo n2: Measure productivity and profitability across projects
Tracking time is just the first step in understanding your team’s productivity and the overall health of your projects. By adding a time tracking tool to your workflow, you can do just that.
With Timeneye, businesses can not only track time but also add estimates and gather actionable data to monitor profitability.
Timeneye seamlessly integrates time tracking and estimation into Microsoft Planner:
By comparing tracked time against initial estimates, Timeneye helps identify inefficiencies, ensuring projects stay on budget and on schedule. Additionally, all the time tracking data is aggregated in the platform’s detailed reports: Timeneye provides insights into which projects deliver the highest returns, enabling data-driven decisions to optimize resources and prioritize profitable initiatives.
Conclusion
In conclusion, Microsoft Planner offers a robust platform for agencies to manage their projects efficiently, from task assignments to collaboration and beyond. Then, to truly maximize productivity and ensure projects are completed on time and within budget, integrate a time tracking tool. Timeneye seamlessly syncs with Microsoft Planner, allowing you to track time directly on your tasks, set estimates, and gain valuable insights into your team's performance.
Don't let time slip away— take control of your project timelines.

.png?width=2136&height=1040&name=planner%20home%20(1).png)

